Showing posts with label review. Show all posts

Saturday, January 14, 2017

Rimmel ScandalEyes Precision Micro Eyeliner


What are your thoughts on Rimmel ScandalEyes precision micro eyeliner? The one I have is "waterproof" but I wanted to bring up something that has been happening to me with this particular item. If you've had a similar experience with this please let me know in the comments that I'm not the only one.

I've had this for a while now and I've been using it on and off. I didn't realize until yesterday that this made me eyelids itch then burn which in turn made them water. Literally right after I applied this to my lash line, it started to itch a little. After a few seconds I felt a faint burning sensation then my eyes began to water. I was literally crying because my eyes wouldn't stop watering.

I itched my watery eyes and guess what came off. You guessed it. The eyeliner came off. So much for "waterproof". I looked in the mirror and my eye makeup was still good by my eyeliner had smudged, transferred to the top of my eyelids and ran because my eyes were watering so badly and from me itching my eyelids. After the eyeliner had been smudged and scratched off from me scratching my eyelids the burning stopped and my eyes stopped watering.

I don't know if I'm allergic to something in this but whatever it was it hurt. My eyelids aren't swollen or anything they just itched. I shook it up before applying just in case but it still burned. My eyes aren't overly sensitive so I'm not sure why this made my eyes itch and burn. So you might want to skip this but I really do love all their waterproof kohl kajal eyeliners though if you're in the market for them. Especially, the black, brown and nude ones and they are about the same price as this item.


I really wanted to love this because the applicator is nice and the color payoff is super great but it just had to itch and burn. None the less I still like Rimmel. Just this product didn't work out.

Friday, October 14, 2016

FOOD: Best Home Made Pizza EVER!

It was pizza day today at our house. So I thought I'd blog about it. Even though I was actually planning to blog about our pizza day.

Everything was made from scratch except for the sausage, pepperoni and mozzarella cheese. Those I kind of cheated on and just bought them from the store. I though I'd blog about the most wonderful pizza dough that I've ever made. I actually got the recipe from Crouton Crackerjacks if you wanted to give his recipe a try. The video is linked above so by all means check him out!

The recipe calls for:
2 T sugar
3/4 cup warm water
1 t active dry yeast
1 t salt
1 T olive oil
2 cups all purpose flour


This is how my yeast ended up looking like. I took a photo too soon but your yeast should foam up pretty good after 10 or so mins.

We live in Arkansas and it's starting to cool down a lot so I couldn't throw my dough in my car like I normally do and let it rise that way. So today I preheated my oven to the lowest it could go and then turned the oven off and let the dough sit in the oven. It came out perfectly fine. I threw on some pizza sauce I made then topped it off with cheese, pepperoni, sausage, green and red bell peppers, and some mushrooms. Obviously you can top your pizza with whatever you want but this is what he had.


We also made a stuffed crust pizza with the same pizza dough. My kids love it! We've been using this recipe for about a good 6 months or so now. We still enjoy it. It may be a little bit more time consuming but I feel like I save just a tad bit of money making it at home. I can make two pizzas for about the same price of one pizza if I were to buy it. Plus the little ones love to help.

Tuesday, August 2, 2016

ZzzQuil


A few weeks back I got a box from Influenster and in it was a small purple box. It was ZzzQuil.  It's supposed to be a nighttime sleep aid that is non-habit forming. I only received two pills so I don't know how I'm supposed to test that out. However, the one time I did need it it did the job. I've always had sleep problems so this did the job for when I needed it.


I'm not sure if this is readily available just yet but when it is I do have a $2 coupon that I intend to use. I'm the type of person who even though I have sleep problems I tend to let myself fall asleep on my own rather than taking something to aid in my sleep. Unless I have something important to do the next day.

TIP: For those suffering from some kind of insomnia a nice cup of warm herbal tea always helps me.

Friday, June 3, 2016

Julep Your Lip Addiction Tinted Lip Oil Treatment

Today, I bring to you the Julep your lip addiction tinted lip oil treatment in the shade Covet. I received this in the May 2016 Julep box. I was NOT sent this. I paid for it in a sense. I used my points to get the box basically free. Which is basically the only reason why I've stayed with them. Anyway...back to the product.


Covet is a sheer pretty pinky-red shade. It has a slight fruity candy smell but not over powering to say the least. After applied the smell does go away. Just in case some of you think its going to taste like anything. It tastes just like oil.


The applicator is kind of funny to describe but you can see from the photo it's like a two sided doe foot applicator.

BEFORE

AFTER

As you can see my lips are pretty pigmented on their own. The first time I put this on I seriously thought it wasn't going to show up but it did. I feel like it kind of actually stains my lips even though they don't make this claim.

I think the real question everyone has is "if it's an oil will it rub off" and the answer is yes and no. After applying the product I have to let it kind of dry down which is only about 10 - 15 mins. I've noticed that if I let it dry before doing anything the oil will rub off making my lips less shiny through out the day but the pigment doesn't rub off with the oil.

I noticed that while I was drinking tea I could clearly see oil marks left by my lips on the mug. But there was no actual color transfer. I was drinking out of a white mug so from what I could tell maybe in the very slightest transfer but not much to the point that there was obvious color left behind.

I also noticed that after I used the lip oil my lips felt dryer than they were before I used it. It made my lips soft but the dry, cracked parts felt even dryer like how they would right before my lips start cracking and peeling in the winter. It's a very hard thing to describe.


Overall, it isn't bad but it isn't amazing to the point where I feel you have to run out and buy it.

Wednesday, January 15, 2014

Julep Joy & Julie G Sugar Plum Fairy

I recently received both Juleps Joy and Julie G's Sugar Plum Fairy from two different swaps. I couldn't decide on which polish to put on first so I put them both on and I am very satisfied with them.
Joy is a beautiful mauve-y pink. Honestly I have no other polishes like this shade as I stick to purples or brighter shades of pink. I'm happy I swapped for this polish. To be even more honest I feel like I have to purchase a back up as soon as possible because this shade is no longer sold.
Julep polishes do run on the more expensive side as they retail for $14 for non-mavens and $11.20 for mavens. If you don't know what a MAVEN is, just click the link. It's nail polish subscription service for about $20 a month. You get 2-3 polishes depending on what your "maven style" is.

$14 for a polish to me is pricey and most of Juleps polishes in the past have been kind of thick and goopy, but not this one. This polish was actually very nice. The consistency was a little thinner and very opaque in one coat. I did two coats for all my nails and I noticed that if I wasn't careful with how much polish was on the brush when applying, my nails looked like I had just painted on one thick coat. Which obviously doesn't look too appealing. After the polished dried, which was actually pretty quick the polish kind of evened out by itself, which is always nice.
Sugar Plum Fairy is a very pretty matte true indigo shade with metallic blue/purple shimmer. This polish shade catches the light so beautifully I honestly can't completely describe the color. The shade is outstanding but I found it weird that mine had no texture. It just feels really rough and matte. Other then that there's basically no texture. If you would like to try this brand out Julie G polishes retail for $3.99 and are sold at numerous stores. Although, oddly enough I have never found these polishes in any of my local drugstores.

**NOTE: Sorry my nails look really crappy. They've been really dry lately.**


I did my nails Saturday around noon and four days later...they polish has just slightly begun to chip at the very tips of my nails. Both of these polishes are great shades and are great formulas in my opinion as they've survived my daily farm work. I help my mom on her farm during the morning and evening and during the day I'm just like any other mother of two. For both of these polishes to stand all that I am completely wowed.

Monday, January 6, 2014

REVIEW: Jordana Twist and Shine Moisturizing Balm Stain

I purchased the Jordana Twist and Shine Moisturizing Balm Stains about a month ago but I held on to them and tried them out trying to get a feel for all the shades that I have. I picked up 6 out of the 8 available at my local Walgreens for only $2.99. I ended up not getting Rock N Rouge just because I find that I have enough reds already because I don't really wear them. The other shade I ended up not getting because Walgreens was sold out is in the shade sweet pink. Honestly, I think I'm going to go back and find it because it looks gorgeous on the Jordana website.

As stated above I only have six of the shades. I love them all!

The swatches are all really true to color.
L to R: Cranberry Crush, Honey Love, Terra Crave, Nude Chic, Candied Coral, Tropical Frenzy

LIP SWATCHES:
Cranberry Crush: A deep pinky-berry.

Honey Love: Rosey Mauve

 Terra Crave: Rosey Tan

Nude Chic: the name explains itself...

Candied Coral: Red-Coral

Tropical Frenzy: Bright Medium Pink

Overall I have been in love with this line. Not all the shades are as long wearing but they get the job done and stay on for the most part. The least long wearing shades from this line would be the nude shades...the darker shades are a little more long wearing. If you would like to purchase the products shown in this post check out Jordana website or your local Walgreens.

Monday, November 18, 2013

Review & Swatches: Maybelline LE Gilded In Gold Collection

This year Maybelline came out with the best thing ever to hit drugstores and they are the limited edition color tattoos from the Gilded In Gold Collection. If you don't know already then this holiday collection has three limited edition color tattoos. All of which are matte shades!
 **CLICK PHOTOS TO ENLARGE**

I know a lot of ladies compare these to MAC paint pots but honestly I don't know. I do not own any paint pots so I'm not even go to go there and start comparing. I couldn't find these in my local stores so I found a lady on a facebook group who had found them and was willing to ship them to me. All I paid was the price of the tattoos and shipping charges, so thank you Tiffany if you're reading this. Anyways, the three shades in the collection are in the colors 255 Just Beige, 250 Nude Pink, and 260 Matte Brown (from left to right shown in photos).

I think the shade I was most excited about and tried on the instant I received them was the shade in Just Beige. To me, Just Beige is a warm concealer shade but with an added bonus of being long wearing and water proof.
Nude pink is more of a muted, pale, lilac shade rather than a pink color. In the pot it looks more like a mauve-y, dusty, pink so the shade in the pot versus the actual shade you get when applied are different but it is none the less a very gorgeous shade. Great base for purple smokey eyes or any kind of pinky purple look.
The last of the three shades is Matte Brown. Obviously by the name I'm pretty sure you can tell that the color tattoo is matte brown. Off topic but this shade reminds me a lot of smeared chocolate or coco powder when swatched.

I love the Maybelline Color Tattoos as a whole but I think I am going to favor this collection a lot more than the rest of the shades that I already own. These shades are just as long wearing and water proof as any other shade. I did a swatch test just to see how long the shades would last and they stayed put for about a good 18-24 hours on my hand. They went through 2 showers, dish washing, cooking, cleaning, and farm work so these are definitely a must have for any makeup junkie.

Tuesday, November 12, 2013

REVIEW: Rimmel London Stay Matte Liquid Mousse Foundation

Hey, guys so if you watched my stay matte voxbox unboxing then you probably know that I was sent this from Influenster a few weeks ago and I have been trying it out. I initially said that the shade was a little light but after a few uses I noticed it was actually not too bad. A few more weeks in to fall/winter and it will be the perfect shade match.

On the card that came along with the foundation, Rimmel claims the foundation to be "a breakthrough feather light, oil free formula with an airy mousse texture that's comfortable on your skin, never heavy or greasy. Your new beauty staple that delivers all day shine control and blends flawlessly for a natural looking matte finish, all while minimizing the appearance of pores."
You can't really tell from the swatch but the foundation really is an airy mousse texture. This is about a penny size amount and even then it was too much product for one application. I didn't even use all of this to cover my face. I applied this with my beauty blender so it gave me a light to medium coverage. I am pretty sure if you just slapped this on with a regular foundation brush or stipple brush and buff this in it could be a medium to full coverage foundation. I did notice that while using the beauty blender I could slightly build up the coverage in problem areas without it looking cake-y. For example I built up and covered around my chin where I've been having little break outs here and there and the foundation covered it up nicely.
I'm not person who wears foundation on a daily basis so I did find that when I applied this all over my face it did feel kind of heavy and a little bit greasy. However, when I only applied it like how I would normally apply my foundation just around problem areas, around my nose, and under my eyes it didn't feel greasy or heavy and it was actually pretty comfortable. I have bigger pores right next to my nose and I noticed that with using this foundation it covered the pores nicely but it didn't do as great for the pores on my nose.

The wear time of this foundation isn't the longest but also not the shortest. It did make it though the day which for most people would be an 8 hour work day. So I think this would be a decent foundation for oily skin but not so much for dry skin. Since it's been getting chilly my skins been acting up and getting really dry. I noticed that on some days this foundation did cling to and accentuate the dryness of my skin. For my combination ladies I would recommend a good primer so that the foundation doesn't cling on to your dry patches.

That pretty much wraps up my review for this foundation. If you would like a review of anything from my recent hauls then comment and I will add it to my to do list. Be on the look out as I might end up doing a video and posting it on my youtube instead of blogging about it on here. Thanks for checking my blog and I'll talk to you guys next time.

Sunday, November 3, 2013

Haul & Review: Loreal Colour Riche leMatte & laLaque

I made a Walgreens run the other to pick up some allergy medicine for my mom and I finally found the new Loreal Colour Riche leMattes and the laLaques. I thought they were only sold at Target but apparently Walgreens has them for $7.99. I also heard that people have been finding them at rite aid too so definitely check these places out too.

I didn't take any photos of the display but they were right in front by the doors. They didn't hide these like they normally do so I was super happy to find them. Sadly, there weren't that many colors left so I only picked up two shades. One shade from each line.
The leMatte is in the shade Matte For Me and the laLaque is in the shade Lacquer-ized.

Here are swatches of the two shades. The leMatte is a deep pink on the verge of being almost red. As for the laLaque it is pretty purple under toned pinky-purple.
Forgive my no make up face but here is the swatch of the laLaque. It is really pretty and like said on the packaging it is super pigmented. I have naturally pigmented lips and with only one go around my lips you probably wouldn't ever know.
The leMatte shade like I said is so deeply pink that its almost red. Personally I don't like matte lipsticks so thus I feel that this basically feels like any other matte lipstick. Kind of drying but not too bad and well pigmented.

As a whole I like the laLaque more the leMattes. I would really love to get my hands on the rest of the shades so until then I think will be obsessing over finding them.

Tuesday, September 24, 2013

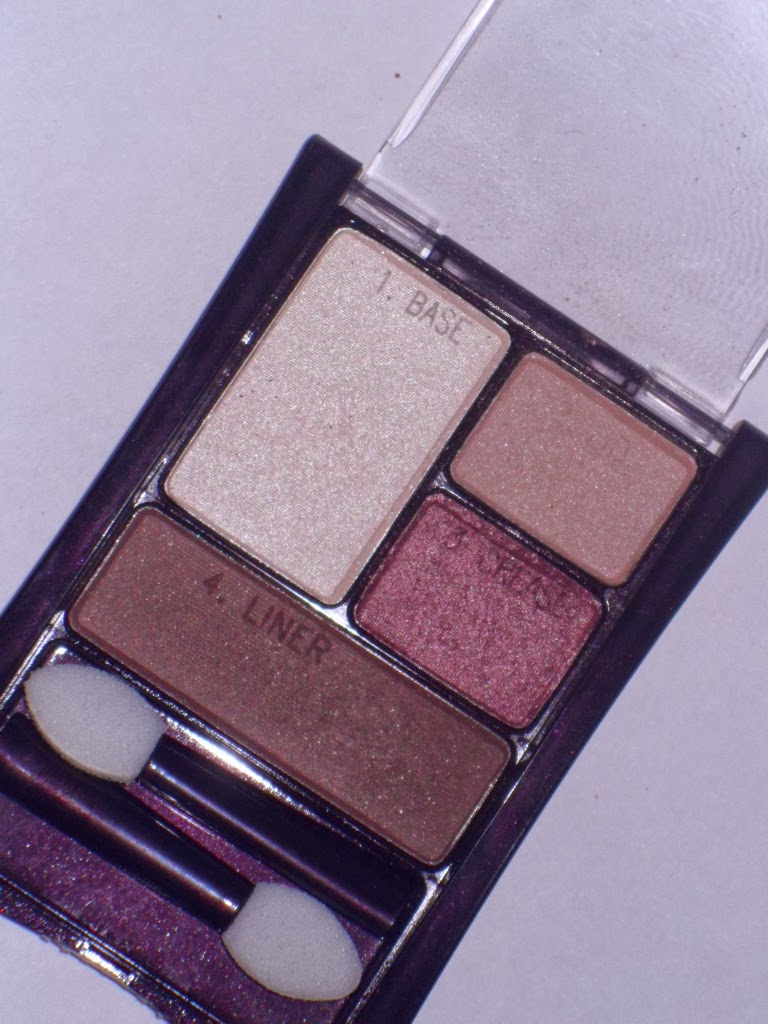
REVIEW: Maybelline Expert Wear in Designer Chocolates

Today's blog post is on the infamous quad in Designer Chocolates by Maybelline. This quad was featured on beautybroadcast.net or also known as EmilyNoel83 on youtube.com. Ever since seeing Emily use this quad I was intrigued and had to get my hands on it. The quad retails for $4.95 on walmart.com but I purchased mine at a Dollar General out in the middle no where so it was slightly higher, about $5.25 or so.


The quad obviously has four shadows, numbered 1 through 4. Shade number 1 is the base shade which is the lightest. Shade 2 is the lid color in the top right corner. Under that is the crease color, shade number 3 and on the very bottom is shade number 4.

With Flash
 

Without Flash/Natural Lighting
**for some reason my camera just would not focus...sorry for the blurry photo**
 
As you can tell from the swatches the colors have a decent amount of payoff. Personally, I think this is a great travel friendly item. Something you can take with you and if it breaks it's a no biggie.
 
 
**NOTE: I know my eye brows are getting bushy. I'm growing them out so that I can change the shape.**
LOOK #1:
 
This is the look I created using the quad the first time I used it. It came out pretty nice if I do say so myself. Something thats neutral and very wearable for every day.
 
GET THE LOOK:
1. Prime lids.
2. Apply liner shade to outer v and blen inwards.
3. Take the crease shade and blend out the harsh edges of the liner shade.
4. Apply base shade all over the lids and into the inner corners.
5. Take lid shade and use as the transition shade from the crease shade into the highlight.
6. Take base shade again and apply on browbone to highlight.
7. Apply mascara, liner, false lashes(optional) and you are done!
 
LOOK #2:
 
This is the second look I created. It's probably going to be more for color lovers but because I used the brown shades on the outside it is a little bit more wearable for every day also.
 
GET THE LOOK:
1. Prime lids.
2. Apply crease shade 3/4 of eye.
3. Take liner shade into outer v and blend inward.
4. Take the lid shade and blend out the liner color that you just put down.
5. Hightlight inner corners and brow bone with base shade.
6. Apply mascara, liner, and false lashes(optional) and you are done!
 
As a whole I really enjoyed this palette. For the price that you pay for this quad it is competely worth it. I'm actually debateing about searching for another Maybelline quad in Emerald which I found earlier seaching for the price of this quad on Walmart. Until then see you guys later!